Getting becalmed for a couple of hours in Darling Harbour on a Hobie Wave catamaran can get you the unwanted attention of impatient ferry captains. That’s why Lakshman decided to get an Ultralight kayak motor and have it mounted on the aft beam of his cat. And with a weight of only 7kg it would not be detrimental to the sailing performance.
Our mission was to come up with a way of installing the motor on the beam and stashing the battery in one of the hulls.
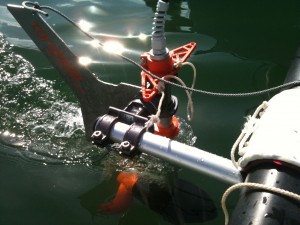
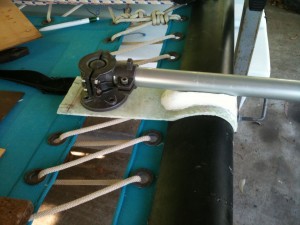
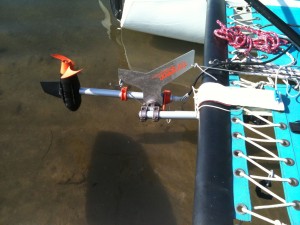
Mal came up with the idea of making a clamp, somewhat similar to the clamp used by the Torqeedo 801 to connect the transom bracket to the shaft. The appeal of using some kind of clamping arrangement is that the beam does not need to be drilled. It also gives the freedom to mount the motor anywhere across the back beam, although I expect that centre mount would be the preferred option.
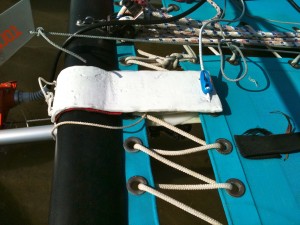
For me a glass-epoxy composite is an easy material to work with—the nice thing is that I can use the beam itself as the mould to make sure the bracket is a perfect match for the shape of the beam. I used kitchen cling-wrap on the beam so the epoxy would not stick to it while forming the shape.
Two matching clamp halves were made in this way—the lower bracket takes the ball joint and has an additional pad to give extra support to the mounting arm. By putting the mounting arm underneath the beam, it places the propeller as deeply in the water as we can get it without using an extension.
The clamp needs a hinge to flexibly join the two halves and I used a rope hinge that is used on Wharram cats. The other end of the clamp is held together using bungie cord which means it only takes a few moments to attach or remove the clamp. The bungie cord lashes through the eyes of the trampoline.
The “tail wing” device on the Ultralight is to allow attachment of lines to raise the motor when sailing, and to hold it down for going astern. Cleats for these lines are included in the Ultralight package but in these photos they were not fitted yet.
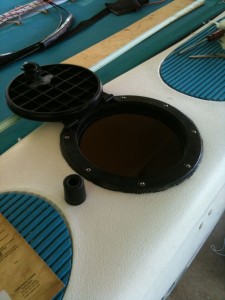
Hobie make an 8 inch waterproof hatch which is just the right size to pass the Ultralight battery so I fitted one of these to the port hull. I built a plywood shelf with lips to retain the battery in the event of a capsize—the shelf is glued to the inside of the hull using a flexible adhesive.
The power cable is passed through the hull with a rubber bung around the cable that allows a good waterproof plugging of the hole. The perfect rubber bung is a rubber doorstop from Clarke rubber—it has just the right diameter and a nice shallow taper that makes it easy to get a tight fit.
The control cable is also passed through the hull using the same method, and using a smaller diameter bung—also from Clarke Rubber.
Before delivery I did a sea trial to confirm that the propeller is deep enough and that it works as planned. The Hobie Wave seems a very low drag hull configuration and at 60 watts it is travelling at around 2.5 knots. So even with the limited size of the Ultralight battery that would still provide almost 4 hours of travel at this speed.
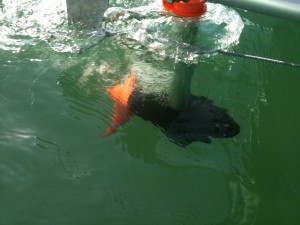
I was not able to properly test it under full power because the prop easily ventilated due to a pocket of air following along behind the motor support tube. Top speed reached was 3.8 knots while drawing 260 watts of power. As soon as the ventilation occured the prop lost power due to pushing aerated water, and it prevented the motor from delivery the full power available (400 watts). This would be improved by making a foil shape around the tube to eliminate the air pocket, and just to be sure, I think a cavitation plate would also help. (And for the technorati amongst us, this is indeed an anti-ventilation plate). I plan to make a foil and cavitation plate soon and it will be interesting to see how much difference they make.
It surprises me that Torqeedo do not provide some sort of foil that can be adapted to different installation depths. It is known to make a useful difference in speed.



Hello!
I found this article on the internet:
http://www.seakayakermag.com/2010/Aug10/torqeedo.htm
It describes the same the effects that you (and me) observed and comes up with the foil solution, seems to be working great.
Have you already build your foil and cavitation plate?
Best regards,
Stefan
Hi Stefan,
That’s a good article in Seakayaker mag. And useful to have that link here.
I didn’t get a chance to make the foil/cav plate yet. Have you made one?
Cheers
Chris
Hi Chris!
Yes, we have made both out of aluminum (1mm sheet). The material is easy to handle and does not rust. I copied the mounting idea with the hose clamp from the other guys, it does really work great and holds the thing in place even at full throttle. Again and again I am astonished about the power of that tiny motor…
In fact the foil did really increase the top speed.
We mounted the motor on an inflatable smartkat catamaran (take a look: http://www.smartkat.de )
With fresh battery and only me on board (98kg) we managed to get the boat up to 4.7 kt. But as my foil does not have a computer calculated shape at 4.5 kt the bubbles re-appeared 🙁
The cav plate was also mounted, but as we had the motor quite deep in the water it did not make any difference.
I am not that experienced with outboarders: is it better to mount it near to the surface or deep in the water?
Best regards,
Stefan
Hello Chris,
we finally managed to break the 5kn barrier with the smartkat and the Ultralight!!
An improved mounting (so that the motor stays in the optimal position) and a much better foil reduce the losses, so that 5,1kn were possible quite easily.
As we have placed the motor a bit deeper in the water we don’t have the need to mount a cav plate.
But what’s even more important: going at 4.0kn now needs a lot less power. This way we have a much better range.
Best regards,
Stefan
Hi Stefan,
Thanks for the update on the Ultralight trials. Do you have some photos and other details about the foil and the mounting? I’d be interested and I’m sure others would. We could put up a new blog entry about your project.
I haven’t made further progress on the Hobie Wave installation and it could be helpful to see what you have done.
Cheers
Chris
Hi, Chris (and Stefan, if you’re still around)
My dad and I are planning to make a cav plate for my new Ultralight 403 (he reckons we should just do that before mucking around making a foil), did you ever get around to doing more work on yours or designing it?
We have a sheet of 2mm aluminium that we’re theoretically going to cut to shape and glue to the shaft, with some other attachment points somewhere to hold it in place.
I can envision having a hole through it that feeds over the shaft, and having the plate rest on the lower orange adjustable bracket. Given that when the motor is mounted, it hangs from the upper orange bracket, what is the lower orange bracket actually for? Does it do anything?
Hi Tim,
No I haven’t done anything more on the Ultralight. Now that I’m back in Sydney and catching up on projects that have fallen behind, i do hope to be able to get back to this.
While working on the Sienna (solar boat) I did experiment with making the foil larger on the Cruise 2 (to help with steering) but the interesting thing was that I used some foam sheet that is typically used for signs, such as a real estate sign. Its about 5mm thick and curves nicely. I used some Purbond polyurethane foaming glue It produces a foam that seems to have similar properties to the foam sheets I used and it can be sanded and shaped easily. So you might want to check that out as a way of making the foil.
As to the bottom orange bracket, its needed to stop the motor from sliding updwards/forwards when you pull on the cord to raise the motor when coming into the beach. But whatever you use as a cav plate/foil would prevent this effect too.
Another option for the foil is that I have a foil from a damaged 801 and you might be able to use that for your experiments. Let me know if you’d like to use it.
Cheers
Chris
Hi Tim!
I just saw your post now (about a year after it’s been posted), anyway – I think the shaft is the main problem, you can see it on Chris’ photo.
We ended up with getting in contact with Torqeedo and it turned out that they could give us the original aluminum foil shaft of a Travel 503, you just have to shorted it for your application. You just put it over the tube shaft and you’re done! So it’s not that much fiddling around with aluminium sheet.
I could imagine that once you had that your urge to make a cav plate would disappear. Anyway, if you would still to do it, it’s much easier to fit it to the new shaft.
Best regards,
Stefan